Using Liquid for Personalization
Very often we see companies create a number of very similar workflows, which only vary slightly. This is not the best practice — you’d have to set up (or change) the same messages multiple times.
There’s a better way. Your emails can be smarter than plain-text. That’s when Liquid comes to help: you can use conditions, insert variables, and do many other great things to personalize your campaigns.
What is Liquid?
Liquid is an open-source template language created by Shopify. Here’s the official full-text manual for your reference. In this guide, you’ll find a few key elements and ideas for customizing your campaigns.
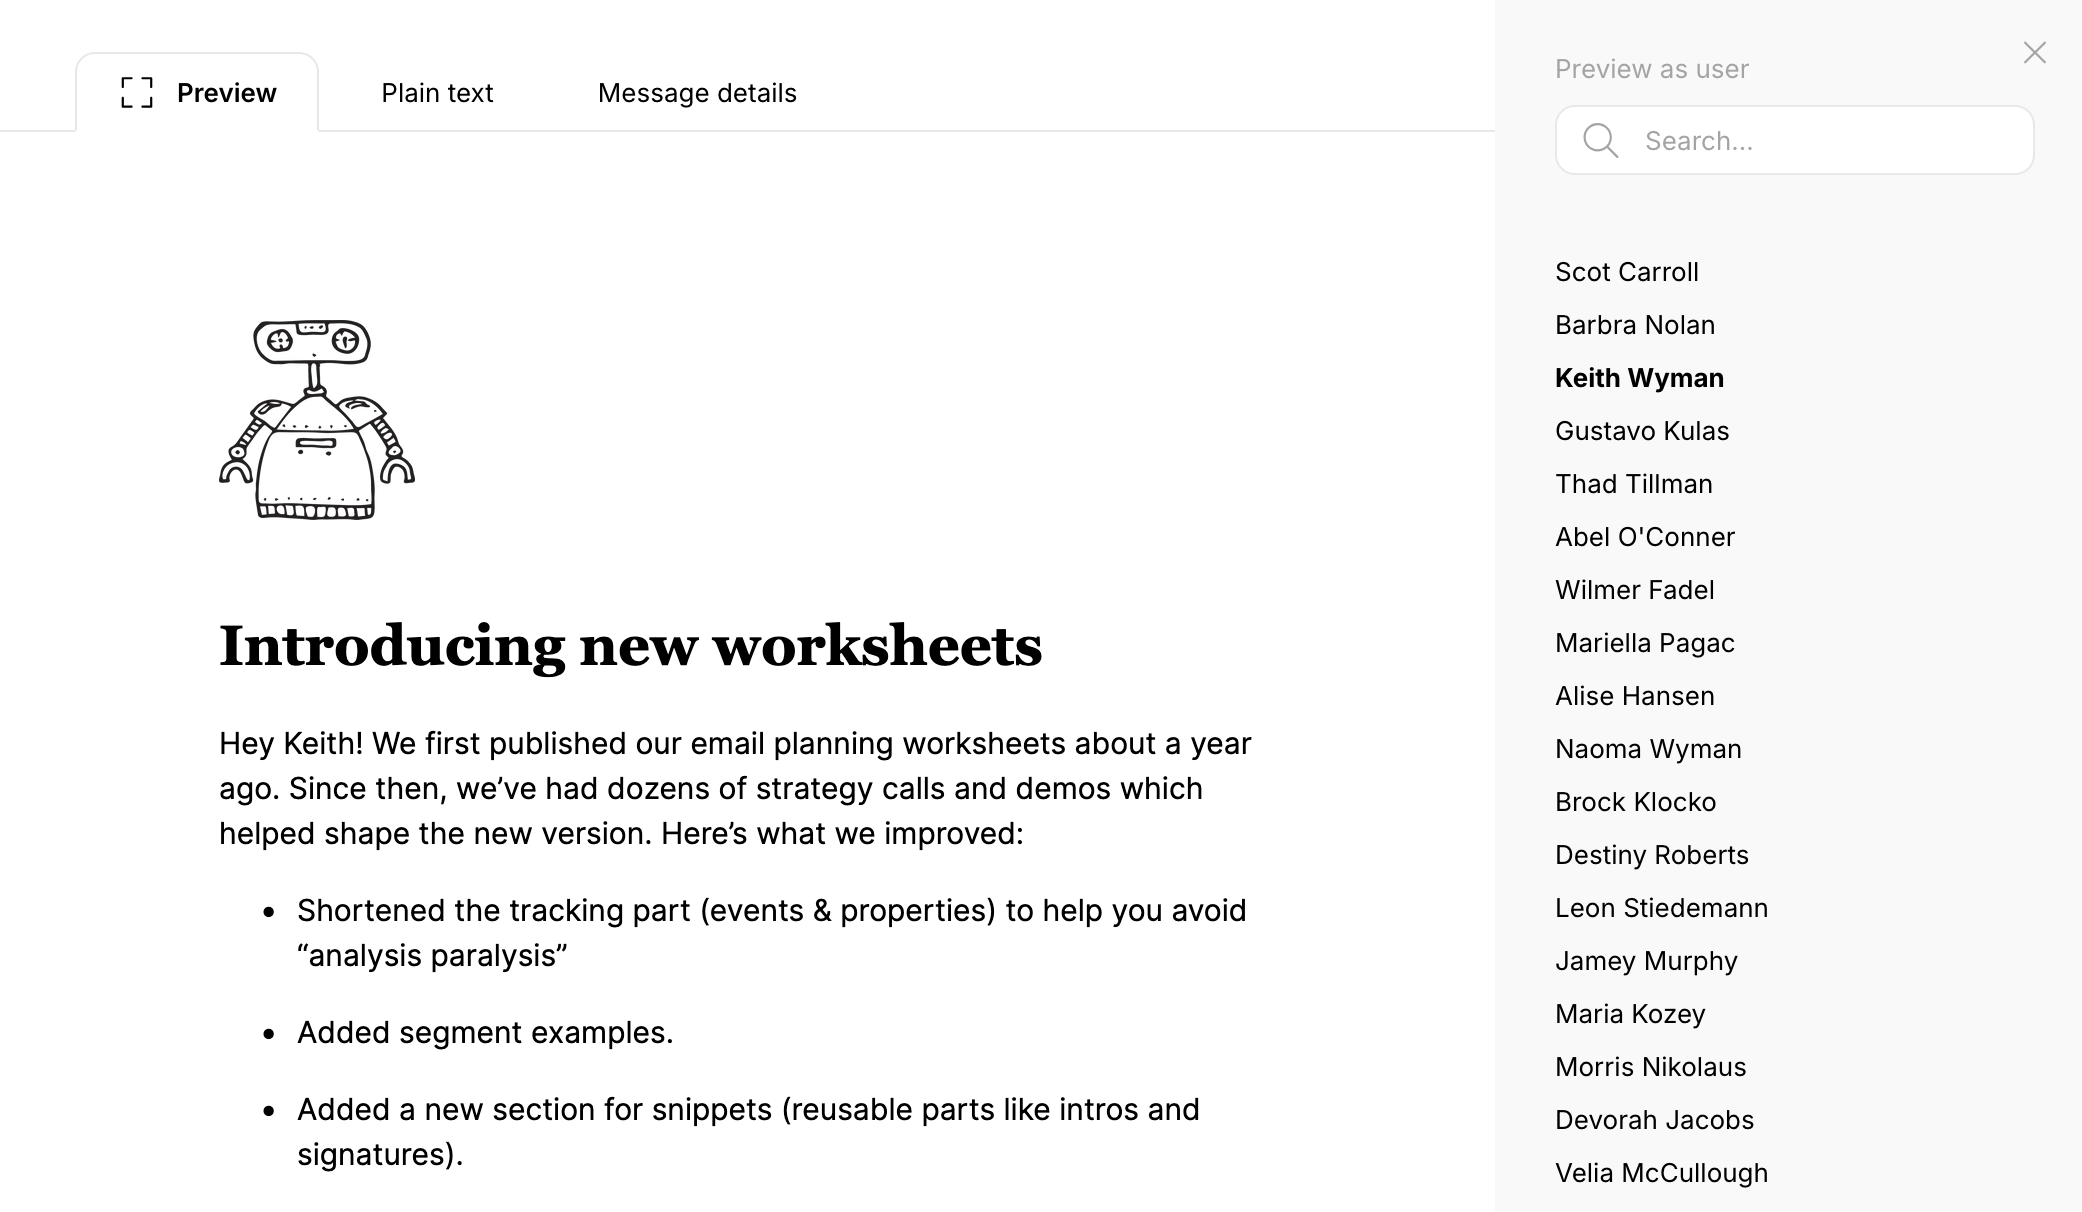
How can I make sure that my Liquid tags work properly?
Our message preview feature allows you to test messages using data from any individual user. You can select one of the names on the right, or find a particular person using the search field. To open the preview window, click “Preview” in the top right corner of the screen.
Property tags provided by Userlist
In Userlist, you can use Liquid tags in message subject, message body,
and footer settings. You can even use them in link URLs. Tags are formatted like this: {{tag name}}.
Below is a list of tags to use if you want to insert specific
properties.
User properties
| Tag | Description |
|---|---|
{{user.id}} |
User’s internal ID (probably won’t be necessary in your messages) |
{{user.identifier}} |
User’s identifier as provided via the Push API |
{{user.email}} |
User’s email address |
{{user.custom_property}} |
User’s custom property of the given name. Common examples (these will only work if you specifically send them to Userlist): {{user.first_name}}, {{user.last_name}}. |
Sidenote: if there is a system property of the same name (i.e. a naming conflict), then your custom property can be specifically accessed by {{user.properties.custom_property}}.
Company properties
| Tag | Description |
|---|---|
{{company.id}} |
Company’s internal ID (probably won’t be necessary in your messages) |
{{company.identifier}} |
Company’s identifier as provided via the Push API |
{{company.name}} |
Company’s name |
{{company.custom_property}} |
Company’s custom property of the given name |
Relationship properties
| Tag | Description |
|---|---|
{{relationship.custom_property}} |
Relationship’s custom property of the given name. |
Your account properties
| Tag | Description |
|---|---|
{{account.id}} |
Internal account ID (probably won’t be necessary in your messages) |
{{account.name}} |
Your company (product) name as defined in Company Settings |
{{account.website}} |
Your company website URL as defined in Company Settings |
{{account.postal_address}} |
Postal address as defined in Company Settings |
{{account.inline_postal_address}} |
Postal address converted into one-line format (new lines become commas) |
{{account.default_sender_name}} |
Default sender name as defined in Sender Profile Settings (it’s usually better to use {{message.sender_name}} though) |
{{account.default_sender_address}} |
Default sender email address as defined in Sender Profile Settings (it’s usually better to use {{message.sender_address}} though) |
{{account.default_footer}} |
Default footer as defined in Company Settings (it’s usually better to use {{message.footer}} though) |
Message Properties
| Tag | Description |
|---|---|
{{message.subject}} |
Message subject |
{{message.footer}} |
Message footer (always the account default right now). It’s automatically included in the template, so most likely you won’t need it inside the message body. |
{{message.unsubscribe_url}} |
Unsubscribe URL (just the URL, not the entire link) |
Event Properties
In workflows started by a custom event trigger (“User performed event”, “Company performed event”), you can also access the event that caused them to start.
| Tag | Description |
|---|---|
{{event.name}} |
Event’s normalized name Example: project_created |
{{event.occurred_at}} |
The time the event occurred at |
{{event.custom_property}} |
Event’s custom property of the given name. Common examples (these will only work if you specifically send them to Userlist): {{event.project_name}}, {{event.invited_by}}. |
Sidenote: if there is a system property of the same name (i.e. a naming conflict), then your custom property can be specifically accessed by {{event.properties.custom_property}}.
Using conditions
You can hide, show, or customize parts of your messages using conditions
(formally called control flow tags in Liquid). Such tags are formatted
like this: {% sample tag %}
if
Shows a part of your message only if a certain condition is true. In the following example, we highlight marketing features to marketers only:
1
2
3
{% if user.occupation == 'marketer' %}
  You can use Sparkle.io to instantly transform photos into marketing materials.
{% endif %}
unless
The opposite of if — shows a part of your message only if a certain
condition is not met. In the following example, we describe the
features to everyone but designers:
1
2
3
{% unless user.occupation == 'designer' %}
  Our features can help you process graphics without an in-house designer.
{% endunless %}
The same result could be achieved using if and != (is not equal to):
1
2
3
{% if user.occupation != 'designer' %}
  Our features can help you process graphics without an in-house designer.
{% endif %}
else
Adds more conditions within an if block. In the following example, we
include a specific sentence for marketers, and show a generic sentence
otherwise:
1
2
3
4
5
{% if user.occupation == 'marketer' %}
  You can use Sparkle.io to instantly transform photos into marketing materials.
{% else %}
  Sparkle.io is a versatile tool for all kinds of agency roles.
{% endif %}
case/when
Allows you to customize a part of copy based on a variety of values. In the following example, we customize the introduction based on the user’s occupation (marketer, designer, or photographer), and show a generic introduction to everybody else:
1
2
3
4
5
6
7
8
9
10
{% case user.occupation %}
  {% when 'marketer' %}
     Dear marketers,
  {% when 'designer' %}
     Dear designers,
  {% when 'photographer' %}
     Dear photographers,
  {% else %}
     Dear users,
{% endcase %}
If the property doesn’t have a value yet, the result will safely fall back to else.
Logic operators
In the above examples, we’ve been using == (is equal to) to compare
values. Below you’ll find other logic operators to use:
| Operator | Description |
|---|---|
== |
Is equal to |
!= |
Is not equal to |
< |
Is less than |
<= |
Is less than or equal to |
> |
Is greater than |
>= |
Is greater than or equal to |
and |
Checks that both condition A and condition B exist |
or |
Checks that either condition A or condition B exist |
contains |
Checks for a substring within a string or an array |
Using iterations
Often you’ll want to loop over a list of items and render each one. You can use the for tag to achive this. Below we iterate over a user’s companies and output each company’s name. Iterations work on array properties, as well as relationships.
Basic loop
1
2
3
{% for company in user.companies %}
  - {{ company.name }}
{% endfor %}
Empty state
You can provide a fallback if the list is empty using else inside the loop:
1
2
3
4
5
{% for company in user.companies %}
  - {{ company.name }}
{% else %}
  You’re not associated with any companies yet.
{% endfor %}
Limit, offset, and order
Render only a subset using limit and offset, or reverse the order with reversed:
1
2
3
4
5
6
7
{% for company in user.companies limit:2 %}
  - {{ company.name }}
{% endfor %}

{% for company in user.companies reversed %}
  - {{ company.name }}
{% endfor %}
Loop metadata
Inside a for loop, the forloop object gives helpful info, such as index (1-based), index0 (0-based), first, and last:
1
2
3
{% for company in user.companies %}
  {{ forloop.index }}. {{ company.name }}{% if forloop.last %} — last company{% endif %}
{% endfor %}
These basics cover most iteration cases. For more details, see the official Liquid iteration documentation.
Available filters
In addition to the standard filters of Liquid, we offer a couple of filters that are unique to Userlist.
Number formatting
| Description | Example | Output |
|---|---|---|
| Format a number with delimiters | {{user.total_photos | format_number}} |
325,234 |
| Format a number as currency | {{user.ltv | format_currency}} |
$1,230.55 |
Both filters accept optional parameters to customize the output. format_number supports delimiter and separator. format_currency additionally supports unit and precision.
| Description | Example | Output |
|---|---|---|
| Custom delimiter | {{user.total_photos | format_number: delimiter: "." }} |
325.234 |
| Custom separator | {{user.ltv | format_currency: separator: "," }} |
$1,230,55 |
| Custom currency unit | {{user.ltv | format_currency: unit: "€" }} |
€1,230.55 |
| Custom precision | {{user.ltv | format_currency: precision: 0 }} |
$1,231 |
| European-style currency | {{user.ltv | format_currency: unit: "€", delimiter: ".", separator: "," }} |
€1.230,55 |
Date calculations
The following examples assume that now is 2021-08-12 10:23:54 UTC.
| Description | Example | Output |
|---|---|---|
| Middle of the day | {{ 'now' | middle_of_day }} |
2021-08-12 12:00:00 UTC |
| Beginning of the minute | {{ 'now' | beginning_of_minute }} |
2021-08-12 10:23:00 UTC |
| Beginning of the hour | {{ 'now' | beginning_of_hour }} |
2021-08-12 10:00:00 UTC |
| Beginning of the day | {{ 'now' | beginning_of_day }} |
2021-08-12 00:00:00 UTC |
| Beginning of the week | {{ 'now' | beginning_of_week }} |
2021-08-09 00:00:00 UTC |
| Beginning of the month | {{ 'now' | beginning_of_month }} |
2021-08-01 00:00:00 UTC |
| Beginning of the quarter | {{ 'now' | beginning_of_quarter }} |
2021-07-01 00:00:00 UTC |
| Beginning of the year | {{ 'now' | beginning_of_year }} |
2021-01-01 00:00:00 UTC |
| End of the minute | {{ 'now' | end_of_minute }} |
2021-08-12 10:23:59 UTC |
| End of the hour | {{ 'now' | end_of_hour }} |
2021-08-12 10:59:59 UTC |
| End of the day | {{ 'now' | end_of_day }} |
2021-08-12 23:59:59 UTC |
| End of the week | {{ 'now' | end_of_week }} |
2021-08-15 23:59:59 UTC |
| End of the month | {{ 'now' | end_of_month }} |
2021-08-31 23:59:59 UTC |
| End of the quarter | {{ 'now' | end_of_quarter }} |
2021-09-30 23:59:59 UTC |
| End of the year | {{ 'now' | end_of_year }} |
2021-12-31 23:59:59 UTC |
It is also possible to modify the time by one or multiple dimensions. The following examples assume that now is 2021-08-12 10:23:54 UTC.
| Description | Example | Output |
|---|---|---|
| Seconds | {{ 'now' | advance: seconds: 2 }} |
2021-08-12 10:23:56 UTC |
| Minutes | {{ 'now' | advance: minutes: 2 }} |
2021-08-12 10:25:54 UTC |
| Hours | {{ 'now' | advance: hours: 2 }} |
2021-08-12 12:23:54 UTC |
| Days | {{ 'now' | advance: days: 2 }} |
2021-08-14 10:23:54 UTC |
| Weeks | {{ 'now' | advance: weeks: 2 }} |
2021-08-26 10:23:54 UTC |
| Months | {{ 'now' | advance: months: 2 }} |
2021-10-12 10:23:54 UTC |
| Years | {{ 'now' | advance: years: 2 }} |
2023-08-12 10:23:54 UTC |
If you’d like to show the end of the next month, you can combine the filters.
1
{{ 'now' | advance: months: 1 | end_of_month}}
Assuming that now is 2021-08-12 10:23:54 UTC, this will output 2021-09-30 23:59:59 UTC.
Serialization
You can convert any value into its JSON representation. This is useful when passing data to JavaScript or external services.
| Description | Example | Output |
|---|---|---|
| Converts a value into JSON | {{user | json}} |
{"email": "foo@example.com", ...} |
Cryptography
You can generate hashes and HMACs from any value. This is useful for generating checksums or verifying identities with third-party services.
| Description | Example | Output |
|---|---|---|
| MD5 hash | {{user.email | md5}} |
d41d8cd98f... |
| SHA1 hash | {{user.email | sha1}} |
da39a3ee5e... |
| SHA256 hash | {{user.email | sha256}} |
e3b0c44298... |
| HMAC-SHA1 | {{user.email | hmac_sha1: "key"}} |
f7bc83f430... |
| HMAC-SHA256 | {{user.email | hmac_sha256: "key"}} |
5d5d139563... |
Pluralization
The pluralize filter selects the correct singular or plural form based on a count. The count is always included in the output.
| Description | Example | Output |
|---|---|---|
| Simple English word | {{ user.login_count | pluralize: "time" }} |
1 time, 3 times. |
| Irregular words | {{ user.mouse_count | pluralize: one: "one mouse", other: "%{count} mice" }} |
one mouse, 3 mice |
| Non-English locale | {{ user.project_count | pluralize: one: "%{count} Projekt", other: "%{count} Projekte", locale: "de" }} |
1 Projekt, 3 Projekte |
For irregular words or non-English locales, each option corresponds to a plural category (one, other, few, many, two, zero) and you can use %{count} to insert the count into any form. The correct form is chosen based on the locale’s pluralization rules — this works for languages with complex rules like Polish (one/few/many/other) or Arabic (zero/one/two/few/many/other).
Popular customization formulas
Use a default placeholder
Use a placeholder if the property hasn’t been specified. The following example will say friend if there’s no first name available:
1
{{user.first_name | default: "friend"}}
Capitalize property values
The following example capitalizes the first_name property with the
capitalize filter:
1
{{user.first_name | capitalize}}
Combined with the previous placeholder formula, it would look like this:
1
{{user.first_name | capitalize | default: "friend"}}
The default "friend" value won’t be capitalized because capitalize
only applies to everything on the left (it’s called “pipeline” syntax).
Similar to capitalize, you can also use upcase and downcase to
convert the value to uppercase or lowercase.
Add text before or after a property
For this, use the following filters:
prepend— adds text in the beginningappend— adds text in the end
In the example below, we’re adding a sign @ before the recipient’s handle:
1
Hey {{user.handle | capitalize | prepend: "@"}}
If their handle is catwoman, the result will be Hey @Catwoman.
Show the first name
If you only have full_name of your users available, you can extract
their first name (the first word) with the following formula:
1
{{user.full_name | split: " " | first}}
Format date & time
To make date & time properties readable, you should customize their format when inserting them into your messages. Here are some common examples:
| Example | Output |
|---|---|
Your trial expires on {{user.trial_expiration | date: "%B %-d, %Y"}} |
Your trial expires on January 7, 2019 |
Congratulations, you’ve been with us since {{user.signed_up | date: "%Y"}} |
Congratulations, you’ve been with us since 2015 |
Today is {{now | date: "%A, %b %d, %Y at %I:%M %P"}} |
Today is Tuesday, Oct 06, 2018 at 06:15 pm |
You can find the full list of date & time placeholders in this documentation.
Show how many days are left in a trial
Here’s an example showing how many days are left in user’s trial:
1
Thanks for being with us! You have {% assign current_date = 'now' | date: '%s' %}{% assign future_date = user.trial_expiration %}{{future_date | minus: current_date | divided_by: 86400}} days left in your trial.
We’re calculating the difference between two dates and dividing it by 86400 (number of seconds in a day). The result will be rounded down.
Humanize numbers
You can use the following formula to display integers as words (e.g. “two” or “fifty five”):
1
Congrats, you have taken {{user.recent_photos | humanize}} photos today!